最終更新日:2021/12/07 原本2019-08-31

動画配信サーバー構築(nginx+nginx-rtmp-module)

■概要

オンデマンド配信、ライブ配信を行う動画配信サーバーを構築する。ここでは、nginx+nginx-rtmp-moduleを使用して動画配信サーバーを構築する。動画はHTTP Live Streaming形式で配信する。
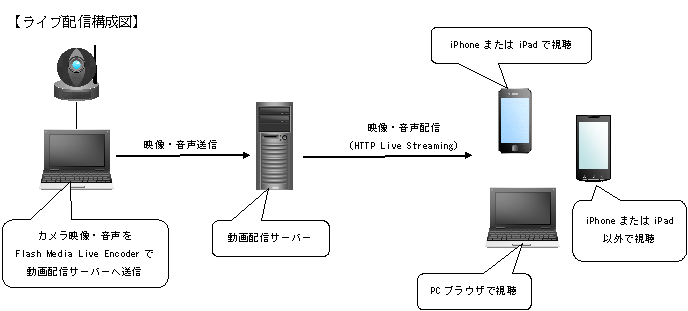
また、Webカメラを接続したPCからカメラ映像・音声をFlash Media Live Encoderで動画配信サーバーへ送信し、動画配信サーバーでは受信したカメラ映像・音声をHTTP Live Streaming形式で配信する。(下図参照)
なお、HTTP Live Streaming形式を再生できないブラウザ向けにはhls.jsを動画配信ページに組み込むことにより、すべてのクライアント(Media Source Extensions (MSE)をサポートしていないWindows 7 の Internet Explorer 11を除く)で動画を視聴できるようにする。

※なお、本ページでは既にWebサーバーが稼動しているものとし、nginxの使用ポートを通常の80番ではなく8080番とすることにより既存のWebサーバーと並存できるようにしている。


[root@centos ~]# yum install yum-utils [root@centos ~]# yum install epel-release [root@centos ~]# yum install https://download1.rpmfusion.org/free/el/rpmfusion-free-release-7.noarch.rpm [root@centos ~]# yum update

■nginx+nginx-rtmp-moduleインストール

[root@centos ~]# wget https://nginx.org/download/nginx-1.9.9.tar.gz ← nginxダウンロード
※最新版のURLはダウンロードページで確認すること

[root@centos ~]# tar zxf nginx-*.tar.gz ← nginx展開

[root@centos ~]# cd nginx-* ← nginx展開先ディレクトリへ移動

[root@centos ~]# yum install pcre-devel.x86_64 pcre2-devel.x86_64 pcre2-tools.x86_64 pcre-tools.x86_64 openssl-devel.x86_64

[root@centos nginx-1.9.9]# git clone https://github.com/arut/nginx-rtmp-module.git ← nginx-rtmp-moduleダウンロード

[root@centos nginx-1.9.9]# ./configure --add-module=nginx-rtmp-module/ && make && make install ← nginx+nginx-rtmp-moduleインストール

[root@centos nginx-1.9.9]# cd ← nginx展開先ディレクトリを抜ける

[root@centos ~]# rm -rf nginx-* ← nginx展開先ディレクトリとダウンロードしたファイルを削除

■nginx設定

[root@centos ~]# vi /usr/local/nginx/conf/nginx.conf ← nginx設定ファイル編集
http {
    server_tokens off; ← 追加(バージョン情報隠蔽)
・
・
・
    server {
        listen       8080; ← HTTPポート番号変更

        faviconエラーログ無効化設定追加(ここから)
        # faviconが存在しない旨のログを出力しないようにする
        location /favicon {
            empty_gif;
            access_log    off;
            log_not_found off;
        }
        faviconエラーログ無効化設定追加(ここまで)

RTMPサーバー設定を最後尾へ追加(ここから)
rtmp_auto_push on;
rtmp {
    server {
        listen 1935;
        access_log logs/rtmp_access.log;
        chunk_size 4096;
        timeout 10s;
        # ライブ配信設定
        application live {
            live on;

            # 192.168.1.0/24からのみライブ配信データの受信を許可
            allow publish 192.168.1.0/24;
            deny publish all;

            # HLS配信設定
            hls on;
            hls_path /usr/local/nginx/html/live; # HLS(HTTP Live Streaming)ファイル作成先
            hls_fragment 10s; # HLS(HTTP Live Streaming)ファイル分割時間
        }
        # オンデマンド配信設定
        application vod {
            play /usr/local/nginx/html/vod; # 動画ファイル格納先
        }
    }
}
RTMPサーバー設定を最後尾へ追加(ここまで)

[root@centos ~]# mkdir /usr/local/nginx/html/vod ← 動画ファイル格納先ディレクトリ作成

[root@centos ~]# chown nobody /usr/local/nginx/html/vod ← 動画ファイル格納先ディレクトリ所有者変更

[root@centos ~]# vi /etc/logrotate.d/nginx ← nginxログローテーション設定ファイル作成
/usr/local/nginx/logs/*.log {
    missingok
    notifempty
    sharedscripts
    delaycompress
    postrotate
        /bin/systemctl reload nginx.service > /dev/null 2>/dev/null || true
    endscript
}

■nginx起動

(1)nginx起動
[root@centos ~]# vi /usr/lib/systemd/system/nginx.service ← nginx起動スクリプト作成
[Unit]
Description=nginx - high performance web server
Documentation=http://nginx.org/en/docs/
After=network.target remote-fs.target nss-lookup.target
[Service]
Type=forking
ExecStartPre=/usr/local/nginx/sbin/nginx -t -c /usr/local/nginx/conf/nginx.conf
ExecStart=/usr/local/nginx/sbin/nginx -c /usr/local/nginx/conf/nginx.conf
ExecReload=/bin/kill -s HUP $MAINPID
ExecStop=/bin/kill -s TERM $MAINPID
PrivateTmp=true
[Install]
WantedBy=multi-user.target

[root@centos ~]# systemctl start nginx ← nginx起動

[root@centos ~]# systemctl enable nginx ← nginx自動起動設定

(2)TCP8080番ポート開放
【ルーター】
ルーター側の設定で、TCP8080番ポートへのアクセスをサーバーに転送するようにする。
※ルーターの設定は各ルーターのマニュアルまたはメーカー別ルーターポート開放手順を参照

【ファイアウォール】
サーバー側のファイアウォール設定で、TCP8080番ポートへのアクセスを許可するようにする。
ファイアウォール設定はこちらを参照

Portチェックテスト【外部からのPort開放確認】で「ホスト名(FQDN) または グローバルIPアドレス」にサーバー名(例:centossrv.com)、「チェックポート番号」に8080と入力、「ご注意・制約事項」を確認チェックして「Portチェック実行」ボタンを押下し、
ホスト:centossrv.com
ポート:8080
にアクセスできました
と表示されることを確認。


■オンデマンド配信確認

(1)動画変換スクリプト作成
[root@centos ~]# rpm -Uvh http://li.nux.ro/download/nux/dextop/el7/x86_64/nux-dextop-release-0-5.el7.nux.noarch.rpm ← nux-dextopリポジトリインストール

[root@centos ~]# yum -y install ffmpeg 

[root@centos ~]# yum install ffmpeg ffmpeg-devel  ← ffmpegインストール

[root@centos ~]# vi convert_to_hls.sh ← HLS形式動画変換スクリプト作成
#!/bin/bash
FILENAME=`basename ${1} | sed 's/\.[^\.]*$//'`
ffmpeg -re -i ${1} -vcodec libx264 -vprofile baseline -acodec copy -ar 44100 -ac 1 -f segment -segment_format mpegts -segment_time 10 -segment_list ${FILENAME}.m3u8 ${FILENAME}-%03d.ts
if [ $? -eq 0 ]; then
    echo "convert completed. => ${FILENAME}.m3u8"
else
    echo "convert failed."
fi

(2)動画をHLS形式に変換
変換元動画をWinSCPで動画格納先(/usr/local/nginx/html/vod)へ格納する。
[root@centos ~]# cd /usr/local/nginx/html/vod ← 動画格納先ディレクトリへ移動

[root@centos vod]# sh /root/convert_to_hls.sh 変換元動画ファイル名 ← HLS形式動画変換
・
・
・
convert completed. => xxxxxxxx.m3u8 ← 動画変換成功

[root@centos vod]# cd ← 動画格納先ディレクトリを抜ける

(3)動画視聴用ページ作成
[root@centos ~]# vi /usr/local/nginx/html/vod.html ← 動画視聴用ページ作成
<!DOCTYPE html>
<html lang="en" class="">
<head>
    <title>ONDEMAND</title>
    <link href="//vjs.zencdn.net/5.11/video-js.min.css" rel="stylesheet">
    <script src="//cdn.jsdelivr.net/hls.js/latest/hls.min.js"></script>
    
</head>
<body>
<video id="video" class="video-js vjs-default-skin" width="640" height="480" controls>
<script type="text/javascript">
    var source = '/vod/動画ファイル名.m3u8';
    var ua = navigator.userAgent;
    if (ua.indexOf('iPhone') > 0 || ua.indexOf('iPad') > 0 || ua.indexOf('Android') > 0) {
        // iOS
        document.write('<source src=' + source + ' type="application/x-mpegURL">');
        document.write('</video>');

    }else{
        // OTHER
        document.write('</video>');
        if(Hls.isSupported()) {
            var video = document.getElementById('video');
            var hls = new Hls();
            hls.loadSource(source);
            hls.attachMedia(video);
            hls.on(Hls.Events.MANIFEST_PARSED,function() {
                video.play();
            });
        }
    }
</script>
</body>
</html>

□PCブラウザからhttp://サーバー名:8080/vod.htmlへアクセスして動画が視聴できること
□iPhoneまたはiPadからhttp://サーバー名:8080/vod.htmlへアクセスして動画が視聴できること


■ライブ配信確認

【PCから配信する場合】

(1)Flash Media Live Encoderインストール
Flash Media Live Encoderを使用してカメラ映像・音声をサーバーへ送信するため、カメラを接続する端末でFlash Media Live Encoderをダウンロードしてインストール

(2)ライブ配信
Flash Media Live Encoderを起動

「Encoding Options」タブを選択

【画面左側】
「Preset」で「High Bandwidth(800Kbps)-H.264」を選択

「Format」のレンチボタンを押下して「Advanced Encoder Settings」ダイアログボックスの「Keyframe Frequency」で「4 Seconds」を選択

【画面右側】
「FMS URL」に"rtmp://サーバーIPアドレス/live"と入力※左記の"live"はアプリケーション名(nginx.confのapplicationで指定した値)を指定

「Stream」に"live"と入力※左記の"live"はストリームキー(任意の値)を指定

「Connect」ボタン押下

「Start」ボタン押下

これでサーバーにカメラ映像・音声の送信が開始される。


【iPhoneから配信する場合】

(1)Live:Air Soloインストール
iPhoneにLive:Air Soloをインストール


(2)ライブ配信
Live:Air Soloを起動


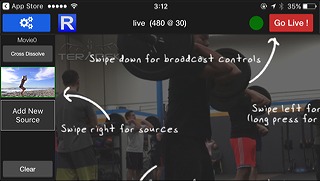
「CUSTOM RTMP」をタップ


「URL」に"rtmp://サーバー名/live"、「Stream」に"live"と入力して、「Add RTMP」をタップ※左記の最初の"live"はアプリケーション名(nginx.confのapplicationで指定した値)、次の"live"はストリームキー(任意の値)を指定


右へスワイプして「Add New Source」をタップ


「iOS Camera」をタップ


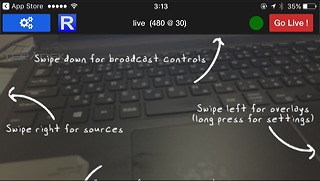
iOSカメラ映像をタップして左へスワイプ


「Go Live!」をタップ

これでサーバーにカメラ映像・音声の送信が開始される。

(3)ライブ動画視聴用ページ作成
[root@centos ~]# vi /usr/local/nginx/html/live.html ← ライブ動画視聴用ページ作成
<!DOCTYPE html>
<html lang="en" class="">
<head>
    <title>LIVE</title>
    <link href="//vjs.zencdn.net/5.11/video-js.min.css" rel="stylesheet">
    <script src="//cdn.jsdelivr.net/hls.js/latest/hls.min.js"></script>
</head>
<body>
<video id="video" class="video-js vjs-default-skin" width="640" height="480" controls>
<script type="text/javascript">
    var source = '/HLS(HTTP Live Streaming)ファイル作成先/アプリケーション名.m3u8(例:/live/live.m3u8)';
    var ua = navigator.userAgent;
    if (ua.indexOf('iPhone') > 0 || ua.indexOf('iPad') > 0 || ua.indexOf('Android') > 0) {
        // Mobile
        document.write('<source src=' + source + ' type="application/x-mpegURL">');
        document.write('</video>');
    }else{
        // OTHER
        document.write('</video>');
        if(Hls.isSupported()) {
            var video = document.getElementById('video');
            var hls = new Hls();
            hls.loadSource(source);
            hls.attachMedia(video);
            hls.on(Hls.Events.MANIFEST_PARSED,function() {
                video.play();
            });
        }
    }
</script>
</body>
</html>

□PCブラウザからhttp://サーバー名:8080/live.htmlへアクセスしてカメラ映像・音声が視聴できること
□iPhoneまたはiPadからhttp://サーバー名:8080/live.htmlへアクセスしてカメラ映像・音声が視聴できること


▲このページのトップへ戻る