ExceptionTest.java
1 2 3 4 5 6 7 8 9 10 11 12 | package jp.ac.utsunomiya_u.is;public class ExceptionTest { public static void main(String[] args) { test(Integer.parseInt(args[0]), Integer.parseInt(args[1])); } static void test(int i, int j) { System.out.println(i / j); }} |
出力
Exception in thread "main" java.lang.ArrayIndexOutOfBoundsException: 0
	at jp.ac.utsunomiya_u.is.ExceptionTest.main(ExceptionTest.java:6)
ExceptionTest.javaの修正
1 2 3 4 5 6 7 8 9 10 11 12 13 14 15 16 17 | package jp.ac.utsunomiya_u.is;public class ExceptionTest { public static void main(String[] args) { System.out.println(args.length); try { test(Integer.parseInt(args[0]), Integer.parseInt(args[1])); } catch (ArrayIndexOutOfBoundsException e) { System.out.println(e.getMessage()); } } static void test(int i, int j) { System.out.println(i / j); }} |
1 2 3 4 5 6 7 8 9 10 11 12 13 | try { 例外の発生する可能性のある処理} catch (例外クラス1 変数名1){ 例外クラス1と関連のある例外が発生した時に実行する処理} catch (例外クラス2 変数名2){ 例外クラス2と関連のある例外が発生した時に実行する処理} catch (例外クラス3 変数名3){ 例外クラス3と関連のある例外が発生した時に実行する処理} ...finally { 例外が発生した場合も発生しなかった場合でも実行される処理} |
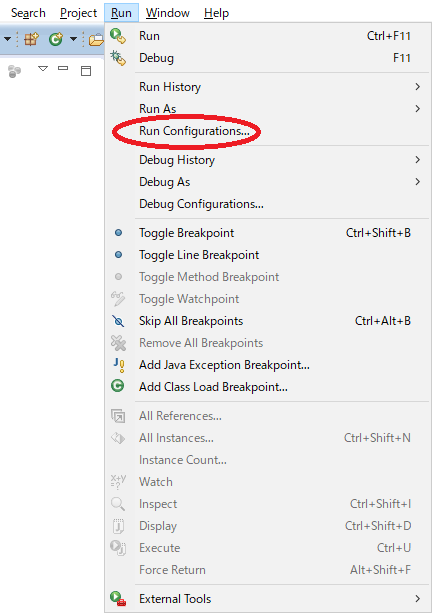
| 1 |
| "Run"->"Run Configurtations..."を選択します. |
|---|---|---|
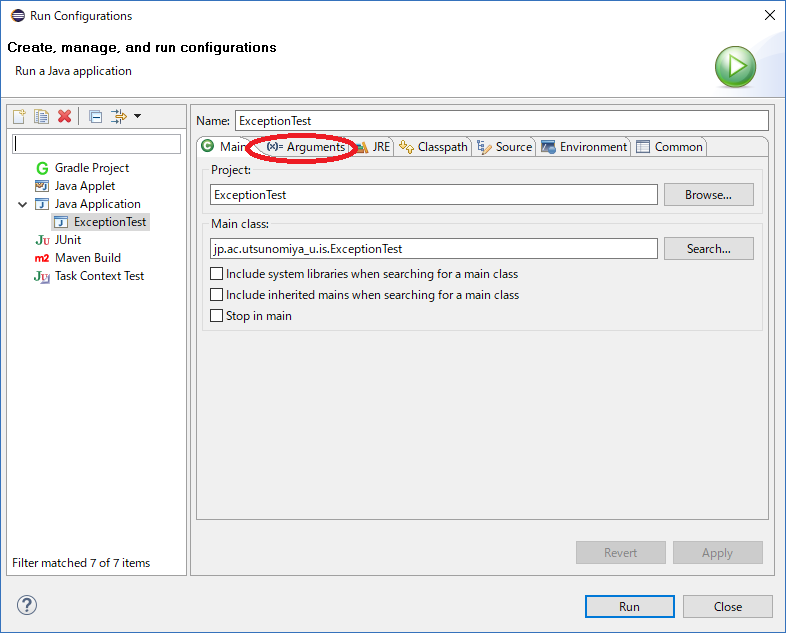
| 2 |
| "Run Configrations"ウィンドウで"(x)=Arguments"タブを選択します |
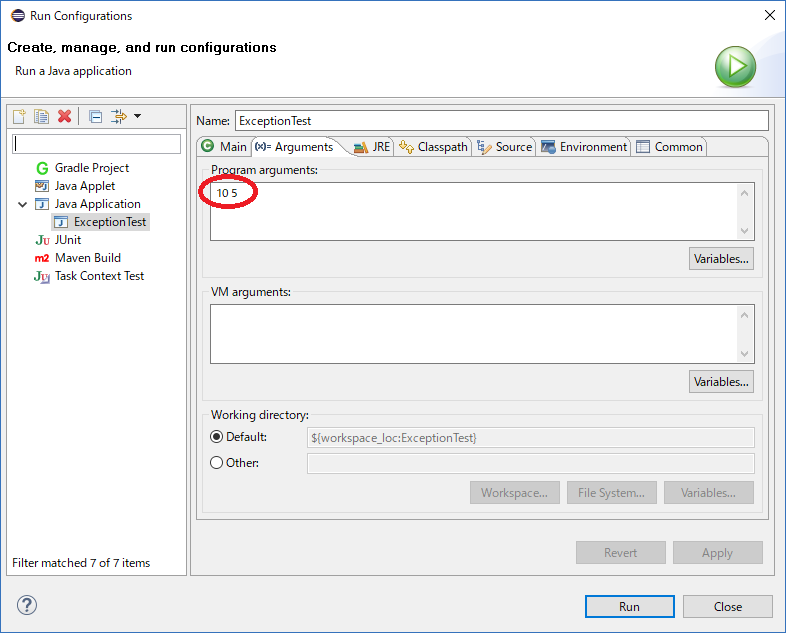
| 3 |
| ”Program arguments:”で引数を記述します. |
Exception in thread "main" java.lang.NumberFormatException: For input string: "a"
	at java.lang.NumberFormatException.forInputString(NumberFormatException.java:65)
	at java.lang.Integer.parseInt(Integer.java:580)
	at java.lang.Integer.parseInt(Integer.java:615)
	at jp.ac.utsunomiya_u.is.ExceptionTest.main(ExceptionTest.java:8)
ExceptionTest.javaの修正
1 2 3 4 5 6 7 8 9 10 11 12 13 14 15 16 17 18 19 | package jp.ac.utsunomiya_u.is;public class ExceptionTest { public static void main(String[] args) { System.out.println(args.length); try { test(Integer.parseInt(args[0]), Integer.parseInt(args[1])); } catch (ArrayIndexOutOfBoundsException e) { System.out.println(e.getMessage()); } catch (NumberFormatException e) { System.out.println(e.getMessage()); } } static void test(int i, int j) { System.out.println(i / j); }} |
Exception in thread "main" java.lang.ArithmeticException: / by zero
	at jp.ac.utsunomiya_u.is.ExceptionTest.test(ExceptionTest.java:15)
	at jp.ac.utsunomiya_u.is.ExceptionTest.main(ExceptionTest.java:8)
ExceptionTest.javaの修正
1 2 3 4 5 6 7 8 9 10 11 12 13 14 15 16 17 18 19 20 21 22 | package jp.ac.utsunomiya_u.is;public class ExceptionTest { public static void main(String[] args) { try { test(Integer.parseInt(args[0]), Integer.parseInt(args[1])); } catch (ArrayIndexOutOfBoundsException e) { System.out.println(e.getMessage()); } catch (NumberFormatException e) { System.out.println(e.getMessage()); } } static void test(int i, int j) { try { System.out.println(i / j); } catch (ArithmeticException e) { System.out.println(e.getMessage()); } }} |
ExceptionTest.javaの修正
1 2 3 4 5 6 7 8 9 10 11 12 13 14 15 16 17 18 19 20 21 22 23 24 | package jp.ac.utsunomiya_u.is;public class ExceptionTest { public static void main(String[] args) { try { test(Integer.parseInt(args[0]), Integer.parseInt(args[1])); } catch (ArrayIndexOutOfBoundsException e) { System.out.println(e.getMessage()); } catch (NumberFormatException e) { System.out.println(e.getMessage()); } } static void test(int i, int j) { try { System.out.println(i / j); } catch (ArithmeticException e) { System.out.println(e.getMessage()); return; } System.out.println(i + j); }} |
出力
/ by zero
ExceptionTest.javaの修正
1 2 3 4 5 6 7 8 9 10 11 12 13 14 15 16 17 18 19 20 21 22 23 24 25 | package jp.ac.utsunomiya_u.is;public class ExceptionTest { public static void main(String[] args) { try { test(Integer.parseInt(args[0]), Integer.parseInt(args[1])); } catch (ArrayIndexOutOfBoundsException e) { System.out.println(e.getMessage()); } catch (NumberFormatException e) { System.out.println(e.getMessage()); } } static void test(int i, int j) { try { System.out.println(i / j); } catch (ArithmeticException e) { System.out.println(e.getMessage()); return; } finally { System.out.println(i + j); } }} |
出力
/ by zero
10
ExceptionTest.javaの修正
1 2 3 4 5 6 7 8 9 10 11 12 13 14 15 16 17 18 19 20 21 22 23 24 25 26 27 28 29 30 31 32 | package jp.ac.utsunomiya_u.is;import java.io.FileInputStream;public class ExceptionTest { public static void main(String[] args) { try { test(Integer.parseInt(args[0]), Integer.parseInt(args[1])); } catch (ArrayIndexOutOfBoundsException e) { System.out.println(e.getMessage()); } catch (NumberFormatException e) { System.out.println(e.getMessage()); } test2(); } static void test(int i, int j) { try { System.out.println(i / j); } catch (ArithmeticException e) { System.out.println(e.getMessage()); return; } finally { System.out.println(i + j); } } static void test2() { FileInputStream fileInputStream = new FileInputStream("test.tex"); }} |
ExceptionTest.javaの修正
1 2 3 4 5 6 7 8 9 10 11 12 13 14 15 16 17 18 19 20 21 22 23 24 25 26 27 28 29 30 31 32 33 34 35 36 37 38 | package jp.ac.utsunomiya_u.is;import java.io.FileInputStream;import java.io.FileNotFoundException;public class ExceptionTest { public static void main(String[] args) { System.out.println(args.length); try { test(Integer.parseInt(args[0]), Integer.parseInt(args[1])); } catch (ArrayIndexOutOfBoundsException e) { System.out.println(e.getMessage()); } catch (NumberFormatException e) { System.out.println(e.getMessage()); } test2(); } static void test(int i, int j) { try { System.out.println(i / j); } catch (ArithmeticException e) { System.out.println(e.getMessage()); return; } finally { System.out.println(i + j); } } static void test2() { try { FileInputStream fileInputStream = new FileInputStream("test.txt"); } catch (FileNotFoundException e) { System.out.println(e.getMessage()); } }} |
出力
test.txt (指定されたファイルが見つかりません。)
ExceptionTest.javaの修正
1 2 3 4 5 6 7 8 9 10 11 12 13 14 15 16 17 18 19 20 21 22 23 24 25 26 27 28 29 30 31 32 33 34 35 36 37 38 | package jp.ac.utsunomiya_u.is;import java.io.FileInputStream;import java.io.FileNotFoundException;public class ExceptionTest { public static void main(String[] args) { System.out.println(args.length); try { test(Integer.parseInt(args[0]), Integer.parseInt(args[1])); } catch (ArrayIndexOutOfBoundsException e) { System.out.println(e.getMessage()); } catch (NumberFormatException e) { System.out.println(e.getMessage()); } try { test2(); } catch (FileNotFoundException e) { System.out.println(e.getMessage()); } } static void test(int i, int j) { try { System.out.println(i / j); } catch (ArithmeticException e) { System.out.println(e.getMessage()); return; } finally { System.out.println(i + j); } } static void test2() throws FileNotFoundException { FileInputStream fileInputStream = new FileInputStream("test.txt"); }} |
1 | throw new HogeException(); |
TextCopy.java
1 2 3 4 5 6 7 8 9 10 11 12 13 14 15 16 17 18 19 20 21 22 23 24 25 26 27 28 29 30 31 32 33 34 35 36 37 38 39 40 41 42 43 44 45 46 47 48 49 50 51 52 53 54 55 56 57 58 59 60 61 62 63 64 65 66 67 68 | package jp.ac.utsunomiya_u.is;import java.io.BufferedReader;import java.io.BufferedWriter;import java.io.FileNotFoundException;import java.io.FileReader;import java.io.FileWriter;import java.io.IOException;import java.util.logging.Level;import java.util.logging.Logger;public class TextCopy { /** * コピー元ファイル名 */ private static final String INPUT_FILE_NAME = "in.txt"; /** * コピー先ファイル名 */ private static final String OUTPUT_FILE_NAME = "out.txt"; public static void main(String[] args) { FileReader fr = null; BufferedReader br = null; FileWriter fw = null; BufferedWriter bw = null; try { // FileReaderのインスタンス生成 fr = new FileReader(INPUT_FILE_NAME); // BufferedReaderのインスタンス生成 br = new BufferedReader(fr); // FileWriterのインスタンス生成 fw = new FileWriter(OUTPUT_FILE_NAME); // BufferedWriterのインスタンス生成 bw = new BufferedWriter(fw); String str; // brから一行読み込みstrに代入 while ((str = br.readLine()) != null) { // strをそのままbwに書き込み bw.write(str); bw.newLine(); } } catch (FileNotFoundException ex) { Logger.getLogger(TextCopy.class.getName()).log(Level.SEVERE, null, ex); } catch (IOException ex) { Logger.getLogger(TextCopy.class.getName()).log(Level.SEVERE, null, ex); } finally { // 各Reader.Writerをnullチェックしてからclose try { if (br != null) { br.close(); } if (fr != null) { fr.close(); } if (bw != null) { bw.close(); } if (fw != null) { fw.close(); } } catch (IOException ex) { Logger.getLogger(TextCopy.class.getName()).log(Level.SEVERE, null, ex); } } }} |
TextCopy.javaの修正
1 2 3 4 5 6 7 8 9 10 11 12 13 14 15 16 17 18 19 20 21 22 23 24 25 26 27 28 29 30 31 32 33 34 35 36 37 38 39 | package jp.ac.utsunomiya_u.is;import java.io.BufferedReader;import java.io.BufferedWriter;import java.io.FileNotFoundException;import java.io.FileReader;import java.io.FileWriter;import java.io.IOException;import java.util.logging.Level;import java.util.logging.Logger;public class TextCopy { /** * コピー元ファイル名 */ private static final String INPUT_FILE_NAME = "in.txt"; /** * コピー先ファイル名 */ private static final String OUTPUT_FILE_NAME = "out.txt"; public static void main(String[] args) { try (BufferedReader br = new BufferedReader(new FileReader(INPUT_FILE_NAME)); BufferedWriter bw = new BufferedWriter(new FileWriter(OUTPUT_FILE_NAME))) { String str; // brから一行読み込みstrに代入 while ((str = br.readLine()) != null) { // strをそのままbwに書き込み bw.write(str); bw.newLine(); } } catch (FileNotFoundException ex) { Logger.getLogger(TextCopy.class.getName()).log(Level.SEVERE, null, ex); } catch (IOException ex) { Logger.getLogger(TextCopy.class.getName()).log(Level.SEVERE, null, ex); } }} |
